Application collectors
JW Media Player
v2.30.0 • For the Javascript Collector
The JW Media Player Extension is a configuration option for the Javascript Collector by Datazoom that makes the following additional data points automatically collectable in real time.
Integration Instructions
Datazoom provides plugins for data collection through our Beacon Services. Integrate the JW Player plugin into your web application with the following snippet: Insert this line into your HTML Replace the This inserts Datazoom's data collection SDK into the page. Insert your JW Player license into the page. Every customer will have their own license for JW player. This is the standard option for customers who only need to collect data from the video player and are not concerned with joining player events with CDN logs or sending CMCD data to a CDN. To activate data collection for a JW Player instance, create a Datazoom context which references the player instance with the following snippet: For example: This option is necessary if you are joining Player & CDN Log data together or want to send CMCD data to a CDN. In this option, Datazoom will handle instantiation of the player with the necessary hooks required to insert parameters like Content Session ID & Request ID in every media request the player makes. A JW Player instance can be created with Datazoom data collection activated, using the following snippet: By creating a player instance through the datazoom.createContextAndPlayer() method, it enables Datazoom to collect more player information to assist QoE monitoring and distributed tracing. For example: JW player supports various alternative formats to configure the media contents for playback, the following are common examples supported by the Datazoom collector. Without using playlist: With playlist: With playlist and playlist sources: If the data collection must be stopped for any reason, for example after the destruction of the corresponding player instance, invoke the We have made it convenient to manage your JW Player Collector integration by providing NPM (Node Package Manager) support. Please see installation details here. JWPlayer API Doc: https://developer.jwplayer.com/jw-player/docs/javascript-api-reference/ Plugin Integration
1<script src='https://platform.datazoom.io/beacon/v1/config?configuration_id=CONFIG_ID'></script>CONFIG_ID value with Collector configuration id.1<script src="http://jwpsrv.com/library/<your_licensed_player.js>"></script>Option 1: Activate Data Collection for an Existing JW Player Instance
1datazoom_context = datazoom.createContext(jw_player);1<html>23<head>4 <!-- THE JW PLAYER LICENSE SCRIPT -->5 <script src='https://content.jwplatform.com/libraries/JW_LICENSE.js'></script>6 <!-- THE DATAZOOM BEACON SCRIPT -->7 <script src='https://platform.datazoom.io/beacon/v1/config?configuration_id=CONFIG_ID'></script>8</head>910<body>11 <!-- THE VIDEO PLAYER -->12 <div class="vid-container">13 <div id="jw-player">14 </div>15 </div>16 <script>17 var jw_player;18 var datazoom_context;19 var config = {20 file: "https://commondatastorage.googleapis.com/gtv-videos-bucket/sample/BigBuckBunny.mp4",21 image: "https://upload.wikimedia.org/wikipedia/commons/thumb/a/a7/Big_Buck_Bunny_thumbnail_vlc.png/320px-Big_Buck_Bunny_thumbnail_vlc.png",22 title: "BigBuckBunny-mp4® Product Video",23 height: 360,24 width: 64025 };26 // Create a Player instance27 jw_player = jwplayer("jw-player").setup(config);28 // Activates data collection29 datazoom_context = datazoom.createContext(jw_player);30 </script>31</body>3233</html>Option 2: Have Datazoom Create a JW Player with Data Collection Activated
1datazoom.createContextAndPlayer(container, config).then(2 function(context) {3 jw_player = context.getPlayer();4 datazoom_context = context;5 }6);1<html>23<head>4 <!-- THE JW PLAYER LICENSE SCRIPT -->5 <script src='https://content.jwplatform.com/libraries/JW_LICENSE.js'></script>6 <!-- THE DATAZOOM BEACON SCRIPT -->7 <script src='https://platform.datazoom.io/beacon/v1/config?configuration_id=CONFIG_ID'></script>8</head>910<body>11 <!-- THE VIDEO PLAYER -->12 <div class="vid-container">13 <div id="jw-player">14 </div>15 </div>16 <script>17 var jw_player;18 var datazoom_context;19 var config = {20 file: "https://commondatastorage.googleapis.com/gtv-videos-bucket/sample/BigBuckBunny.mp4",21 image: "https://upload.wikimedia.org/wikipedia/commons/thumb/a/a7/Big_Buck_Bunny_thumbnail_vlc.png/320px-Big_Buck_Bunny_thumbnail_vlc.png",22 title: "BigBuckBunny-mp4® Product Video",23 height: 360,24 width: 64025 };26 // Activate data collection and create a player instance27 datazoom.createContextAndPlayer("jw-player", config).then(28 function(context) {29 jw_player = context.getPlayer();30 datazoom_context = context;31 }32 );33 </script>34</body>3536</html>1var config = {2 file: "https://demo.datazoomlabs.com/vod/example.m3u8",3 title: "Football Video",4 description: "JW Player Test",5 mediaid: "My Content ID",6 width: 640,7 height: 360,8 autostart: "false"9};1var config = {2 playlist: [{3 file: "https://demo.datazoomlabs.com/vod/example.m3u8",4 title: "Football Video",5 description: "JW Player Test",6 mediaid: "My Content ID"7 }],8 width: 640,9 height: 360,10 autostart: "false"11};1var config = {2 playlist: [{3 title: "Football Video",4 description: "JW Player Test",5 mediaid: "My Content ID",6 sources: [{7 file: "https://demo.datazoomlabs.com/vod/example.m3u8"8 }]9 }],10 width: 640,11 height: 360,12 autostart: "false"13};Stop Data Collection
destroy() method of the Datazoom context object as in the following example:1if (jw_player) {2 jw_player.remove();3 jw_player = null;4}56if (datazoom_context) {7 datazoom_context.destroy();8 datazoom_context = null;9}NPM (Node Package Manager)
References:
CMCD Support
Datazoom provides two discrete settings that control CMCD data collection, one for a specific player event, “Media Object Request”, and one for the corresponding CDN log response.
Player Collector configuration options
Use this option to enable your configured CDN to collect and return CMCD data, contained in the CMCD node of the log line JSON
Off - no CMCD keys are passed
Lite - only the CMCD keys Session ID (sid) and Request ID (rid) are passed to the CDN via query parameter or request header with every “Media Object Request”.
Full - the full set of keys specified by the CMCD standard are passed to the CDN via query parameter or request header with every “Media Object Request”

Bitmovin and JW Player support only the “Lite” setting above
Data Pipe configuration options
Select the CMCD data points you wish to be included in content requests.
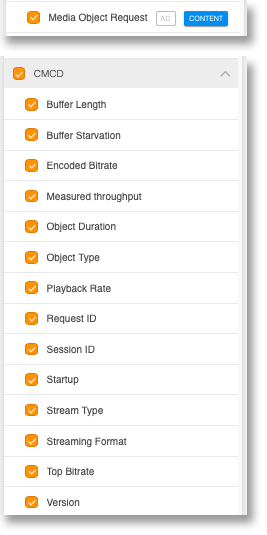
Media Object Request - The video player will emit an event called “media_object_request” that will contain the selected CMCD keys below
CMCD keys - Select the CMCD keys you wish to have included with each Media Object Request
Ad Frameworks Extensions
If your Javascript application has a media player with an ad framework, Datazoom’s Javascript Collector with a JW Media Player can be extended with the following ad framework extensions.
Supported Features
Supported Data Points
Events
Discrete occurrences driven by user interactions or system actions
-
Audio Track Changed

-
Buffer End
-
Buffer Start
-
Cast End
-
Cast Start
-
Cast Transfer
-
Error
-
Exit Fullscreen
-
Fullscreen
-
Heartbeat
-
Media Loaded
-
Media Object Request
-
Media Request
-
Milestone
-
Mute
-
Pause
-
Playback Complete
-
Playback Start
-
Player Ready
-
Playing
-
Qualified View
-
Quality Change Request
-
Rendition Change
-
Resize
-
Resume
-
Seek End
-
Seek Start
-
Stall End
-
Stall Start
-
Stop
-
Subtitle Change
-
Unmute
- Volume Change
Metadata
Player
Attributes
User
Fluxdata
Metrics measuring changing parameters over time
-
Audio Track
-
Bandwidth
-
Buffer Duration (Content Session)
-
Buffer Start Recency (Content Session)
-
Content Buffer Duration (Content Session)
-
Content Buffer Start Recency (Content Session)
-
Content Error Count (App Session)
-
Content Media Request Count (App Session)
-
Content Media Request Recency (Content Session)
-
Content Milestone Recency (Content Session)
-
Content Pause Count (App Session)
-
Content Pause Duration (Content Session)
-
Content Playback Duration (Content Session)
-
Content Playback Start Count (App Session)
-
Content Playback Start Recency (Content Session)
-
Content Seek Count (App Session)
-
Content Session Start Timestamp
-
Content Stall Count (Content Session)
-
Content Stall Duration (Content Session)
-
Content Stall Start Recency (Content Session)
-
Content Startup Duration (Content Session)
-
Error Count (App Session)
-
Heartbeat Recency (Content Session)
-
Pause Duration (Content Session)
-
Pause Recency (Content Session)
-
Playback Duration (Content Session)
-
Playback Rate
-
Player State
-
Player Viewable
-
Player Viewable Percent
-
Playhead Position
-
Playhead Position - Program Date Time
-
Rendition Change Recency (Content Session)
-
Rendition Height
-
Rendition Name
-
Rendition Video Bitrate
-
Rendition Width
-
Seek Start Recency (Content Session)
-
Stall Count (Content Session)
-
Stall Duration (Content Session)
-
Stall Start Recency (Content Session)
-
Startup Duration (Content Session)
-
Subtitle Track
- Volume