Getting started
Overview
Datazoom provides a single, real-time data-as-a-service platform that replaces redundant telemetry architectures with a standardized, lightweight data layer and a financial grade platform to control and govern what is collected and where it is routed. As a Data-as-a-Service offering, Datazoom supports an entire organization's data needs—including Marketing, Product, Advertising, Operations and Engineering—with access to a single source of truth.
The platform allows you to configure what is collected, how it is formatted, and where it is routed on the fly to minimize engineering friction (easy to implement) and prevent SDK bloat (platform controlled automated collection).
Datazoom Service Features and Architecture
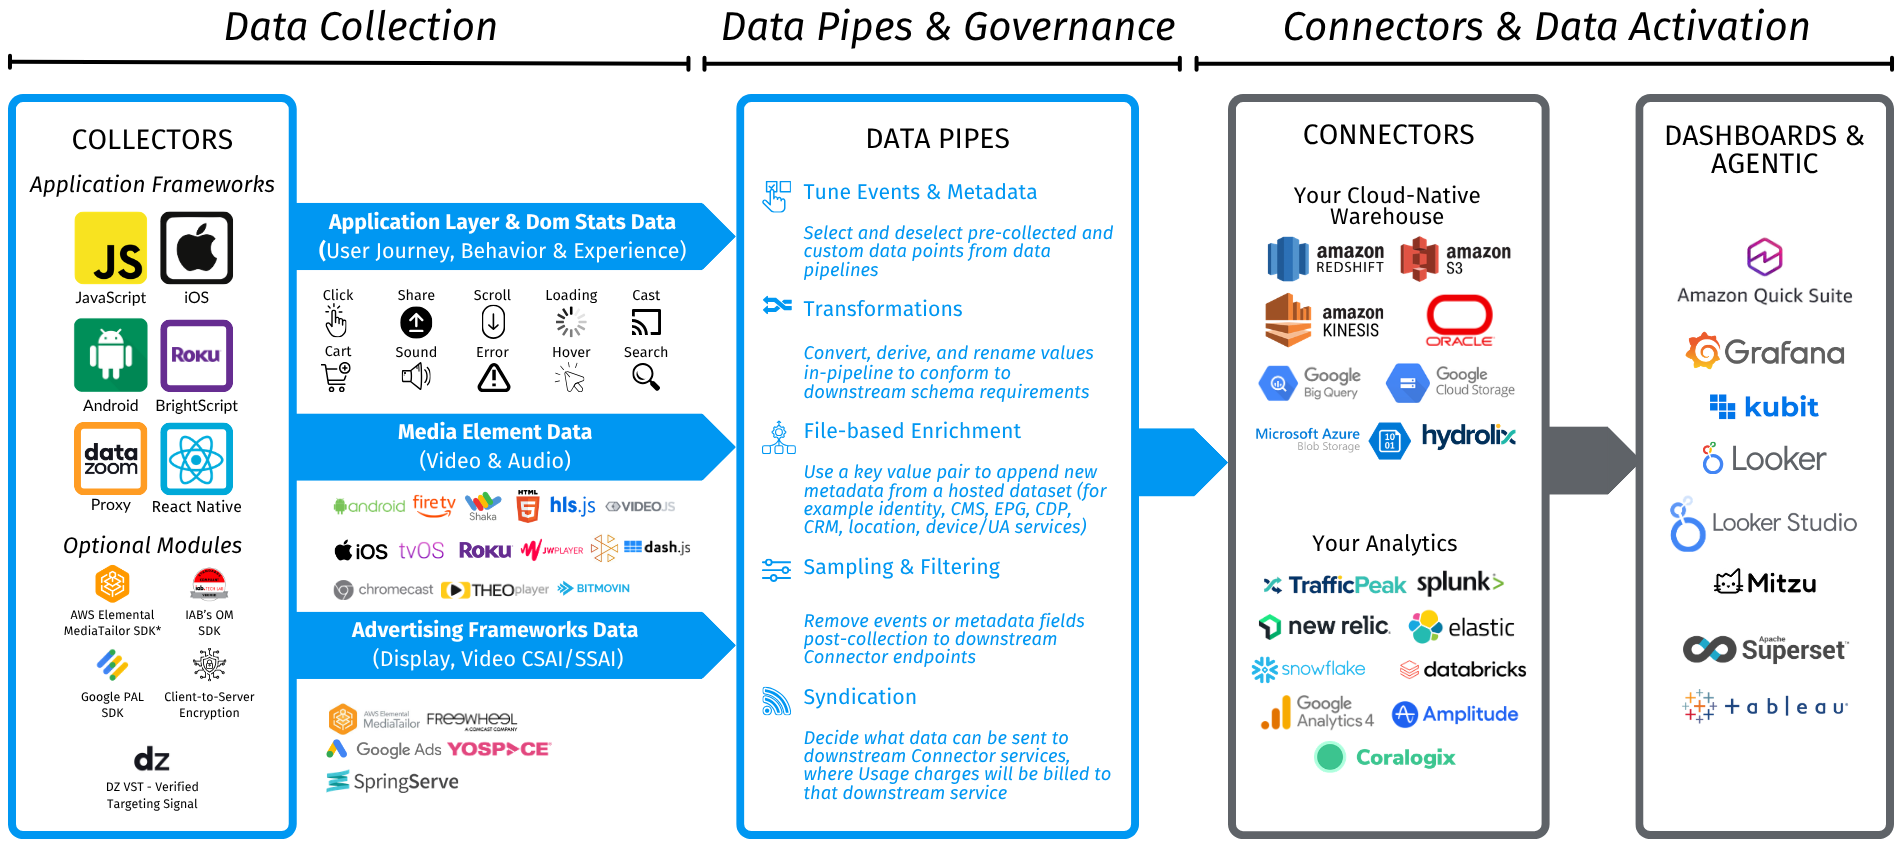
Real-Time Data Collection
A modern data collection strategy has a single point of collection for all aspects of a user's journey for contextual consistency (Who, What, Where, When, and Why). Datazoom supports this collection methodology with a lightweight, purpose-built SDK unifying data collection for digital experiences.
Standardized Dictionaries: Out-of-the-box, Datazoom automatically tracks hundreds of key client-side events, metadata points, and metrics across various native platforms, media players, and advertising frameworks. Refer to ourData Dictionaries for the complete specifications.
SDK Methods: For custom telemetry that is not automatically captured, you can use SDK APIs to emit custom events and metadata. Any custom fields are automatically prefixed with
custom_in the stream. If metadata fields overlap, local player context values take precedence over global application context values.Remote Instrumentation: React to new business questions without waiting for an app store release by targeting UI elements via selectors to collect clicks, hovers, and views and extract metadata. Support in native SDKs is coming soon.
Data Governance & Enrichment
Once captured, data is processed in real time to ensure high data hygiene and rich analytical context before delivery.
Custom Data Aliasing: To address naming inconsistencies across various platforms (such as
userIdvsuser_id), Datazoom allows you to define custom mapping rules. Disparate names and types are standardized to a single format. For configuration steps, seeHow to manage custom data.Global Context & Identity Stitching: Personalize cross-platform user journeys by centralizing authenticated user IDs and anonymous cohort IDs. Injecting these into the global context during the session start event allows downstream systems to stitch together mobile, web, and CTV interactions.
Real-Time Enrichment: Datazoom Enrichment dynamically injects custom metadata from backend systems (such as CRMs, CMSs, CDPs, or ad systems) into streaming events as they occur to provide critical context like Program Title for live playback events and CPM for Ad Impression events without post-processing.
Transformations & Derivations: Apply rules at the Connector level to conform data values and types to a destination’s schema and derive new metadata from other metadata values (e.g. when value of Data A is “X” and value of Data B is greater than “Y”, collect Data N as “Z”) to eliminate post-processing.
White-Listed Domains: Specifying an "allow list" of domains to ensure that your Collector only accepts data from your trusted web properties, blocking unwanted data from scrapers, bots, or development environments.
Pipeline Performance & Cost Optimization
Datazoom provides granular controls to manage costs and application performance.
Basic & Advanced Filtering: For any configured data pipe, individual data points can be selected or deselected dynamically. You can also use customizable rules that take into account the content of each message in deciding whether it should be transmitted to a designated Connector.
Sampling Precision: When you set a sampling rate at the Data Pipe level, if a user session is determined to be in session for a Data Pipe, the events and metadata selected in the Data Pipe will be collected. Additional sampling can be applied at the Connector level.
Context Pruning: Collect large context-setting events once, and configure subsequent lightweight events to carry only joinable context IDs from our out-of-the-box contexts (e.g., app session, content session, ad session) as well as your own easily-definable custom contexts, along with action-specific metadata, and ongoing session metrics (fluxdata) to eliminate redundant contextual data collection.
Custom Inactivity Timeouts: Different platforms exhibit different user behaviors (e.g., active desktop browsing vs. passive CTV viewing). Configure a customInactivity Interval per collector configuration to define exactly when a session expires.
Downstream Activation and Syndication
Datazoom enables immediate real-time activation of streamed data to drive business metrics, user engagement, and partnership value.
Connector Federation: Route processed data to any analytics, warehouse, or monitoring endpoint using our federated architecture. SeeHow to add a connector for configuration details.
Content Timeline Annotations: programmatically distinguish promotional segments from main editorial content within a single video stream. By passing an array of time spans to the SDK, you can isolate promotional segments and correlate in-video promotions with subsequent on-page conversions. SeeContent Timeline Annotations for implementation steps.
Real-Time Data Syndication: Securely share real-time, joinable data streams with third parties with Syndications. Usage fees for shared data are billed directly to the receiving third party's Datazoom account. Syndicate specific events (such as
ad_impression) and associated metadata (cohort_id,content_genre) to a clean room for secure, privacy-compliant attribution matching or interest signals to programmatic bidders to bypass data hops.Metrics Encyclopedia & Dashboard Templates: Use the Formulas and SQL examples in the Metrics Encyclopedia to create popular metrics, and leverage Dashboard Templates to visualize and query Datazoom’s sessionized, event-based, highly-dimensional data.